4 More Things You Didn’t Know You Could Do in Canva
I am a huge fan of Canva (if you can’t tell) and anytime I find news tricks, tools, or hacks I always try to share them on social media. Sometimes you’ll catch them in my stories and other times you’ll catch them as actual posts. A while back I posted about 4 things you didn’t know you could do in Canva and it was a hit. It was probably my first post ever about anything Canva related and therefore led me to post more about these cool new tricks and eventually blogging about them too.
After posting a few weeks about it I decided to do another post and you can find that post on Instagram but I have yet to do a blog over it that gives further explanation on how to accomplish these hacks so this blog will focus on just that.
Before I get started I want to note a quick disclaimer:
This blog is neither endorsed, sponsored, or affiliated with Squarespace. However, Please note that some links are affiliate links and I will earn a small commission if you purchase through those links. I use the product(s) below and recommend them because they are companies that I have found helpful and trustworthy. Please let me know if you have any questions about anything listed below.
Let’s get started.
1. Add Ruler, Guides, Margins, etc.
Okay, I am one of those people who need elements to be perfectly aligned or perfectly placed. It’s a curse and gift, but I sometimes catch myself moving elements and not aligning. Or not being placed where I’d like them to be. Spacing is another issue I have but we won’t go into that. All I will say is that Canva offers great assistance in this area. If you head over to the top of the menu you’ll see the home, file, and resize menu. Select the file option and you’ll see a variety of options such as a ruler, guides, margin, prin bleeds, etc. Below is a quick video to highlight each of the options.
You can use each of them to help you with any specific need, whether it’s creating a magazine, t-shirt design, or a simple promotional graphic these guides and rulers can help you create a more strategic layout design.
Quick hack: to better place your elements hold the ctrl button on your keyboard to move any elements freely on Canva.
2. Present Multiple Presentations
I don’t want to assume everyone knows everything that Canva offers. But one of those is PowerPoint presentations. You can create a PowerPoint and use it for your next class presentation, conference, online course, etc. but did you know that you can actually present multiple presentations? Let’s say you're hosting an online workshop and you want to invite other leaders, coaches, etc. to contribute to be presenters, well you can do that within Canva. You can combine their powerpoints and your PowerPoint together without changing colors or text or having to go back and forth between opening new powerpoints and closing old ones. This works great with multiple presenters. Here’s a quick video to show you how it works.
3. Create Video Graphics
Canva offers a great number of stock photos and elements to select from to create graphics. But did you know that you can access a great number of videos too to help you create video content and even vlogs? It’s true! If you open up a new artwork on the right side of the screen you can select the video option and view hundreds of videos available. One of the best parts of video graphics and even stand along elements is you can make them into gifs. Nowadays video content is being used so heavily because it’s an attention grabber. So if you’re looking to create Instagram reels and TikTok videos as well as other video content you can do that right inside of Canva. And to add another great feature is you can edit the video within Canva as well. There are a few workarounds but it’s definitely possible.

4. Go live on Canva
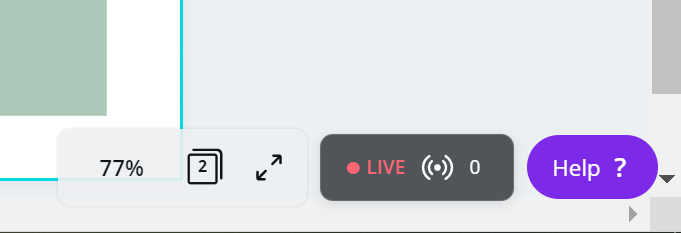
I think the title speaks for itself. But yes, you can go live in Canva. You can even host your own online workshop. When you go live your screen opens full screen with several items. You’ll get a code that you can send to your audience/attendees. Live chat section to interact with your attendees and even a manager’s box screen to allow you to keep track of your presentation, comments, and even communicate with other presenters so that you can keep comments separate from the regular chatbox. I highly recommend trying it out. I certainly will when the time comes.
That’s it for this post so head over to Canva and try these hacks now and share what you come up with in the comments. If you are unfamiliar with what Canva is or how to get started just head over to Canva.com, sign up and create an account, start designing amazing graphics. They have a great resource page where you can learn how to get started and learn all the ins and out of Canva. Some of these tips are pro version only, meaning, you can only access them if you have a Canva Pro account. If you would like to upgrade your plan click the button below to head over and upgrade your plan to unlock these features.
I hope this blog was helpful and I hope you learned a lot today. If you’ve created some great graphics, I’d love to see what you created! Feel free to share below. 😃
Ciao!
-Berenice
Save time customizing your one-of-a-kind website. Sign up to my SquareMoves email list where you’ll get further action steps from blog posts, videos, and more to make your designs stand out on Squarespace!
