

Create an Instagram landing page using Squarespace
For a while now, I’ve been using the free version of Linktree as my landing page on Instagram. Since I have a 3rd party free version I don’t get the flexibility to design my landing page how I want.
On top of that, I don’t get the full traffic insights which is also a bummer. I could pay the pro version, but even then I wouldn’t get the full benefits of design and insights.
I can’t be the only one who’s gone through this same situation which is why I want to share how I created my Instagram landing page using my Squarespace in just 4 simple steps.
Before we get started here’s a quick disclaimer: This blog is neither endorsed, sponsored, or affiliated with Squarespace. However, Please note that some links are affiliate links and I will earn a small commission if you purchase through those links. I use all the products below and recommend them because they are companies that I have found helpful and trustworthy. Please let me know if you have any questions about anything listed below.
We’ll be creating our landing page in the new version of Squarespace (7.1) but the same steps will also work for the older version. You will also need to be subscribed to a plan for your page to function properly. Okay, let’s get started.
1) Create New Page
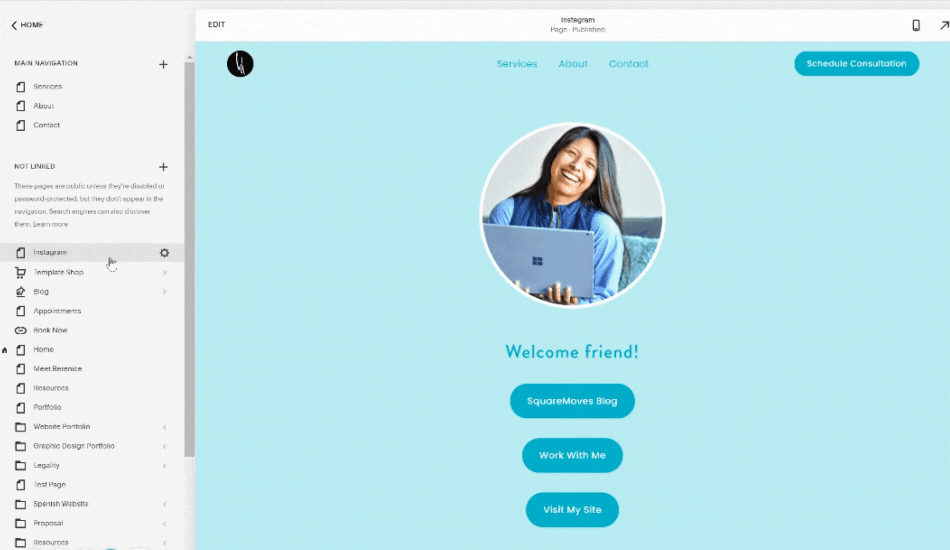
First we need to create a new page so we can customize it how we want it to look. We’ll go to the page tab where we can access all the pages. Click the plus icon under not linked and add a blank page. Name your page, this will also be your url slug but you can change the url slug in the settings page.

2) Edit Page
Now we can edit our page. Here’s a few items to consider when editing your page.
Select your brand color background, or image background
Add Image block - upload your photo preference (I used Canva to get the circle effect)
* Side note: If you do not have Canva pro you can still have a circle effect with the appropriate background color.
Add name or a short introduction below image
Add your link buttons
You’re page may look a little wonky, but that’s okay because we’ll get it squared away in the next step (haha see what I did there). Here’s what my page currently looks like.

3) Input CSS Codes
Okay, now that we’ve edited our page and have added what links we want, now it’s time to customize it.
Your navigation and footer is currently still on the page. It’s okay, but I want my viewers to just focus on my link buttons and I want my page to look similar to Linktree so let’s head back to the page settings and make those adjustments.
In the settings box, click the advanced tab and insert the code below to hide the navigation and footer sections.
<style>#header, #footer{display:none;}</style>
Next, we’re going to edit the buttons. Currently they are all different widths and we want to make them all the same. Head over to the custom css tab by clicking the design tab and insert the following code below.
.sqs-block-button-element{width:80%;}

That’s it! That’s all you need to do. I like to check mine in mobile version just to make sure it all looks good. Now, for the final step.
4) Link To Bio
The last step is to paste the link to your Instagram bio. Go to the edit profile on Instagram and paste to the link section.

Designed using Mockuuups Studio
Ciao!
-Berenice